Bundling Java in a Modpack
Background
Many server owners have been troubled by this for a long time. Because players’ computer environments vary widely, some computers may still have Java 7 installed and therefore cannot launch games above 1.12.2 or clients that contain Mods. So server owners want to bundle a Java runtime (also called a JRE) in the modpack, replacing the JVM that comes with the player’s computer. This article introduces two methods.
Terminology
JREis the abbreviation of Java Runtime Environment. It can usually be regarded as theJavaused by players. In the following text, Java and JRE both refer to this version.
Method 1: Use the Latest Version (Recommended)
EXE Version
When opened on Windows, the EXE version first checks for the jre-arm64, jre-x64, and jre-x86 folders in the same directory.
The check order, from top to bottom, is:
jre-arm64(ARM 64-bit)jre-x64(x86 64-bit)jre-x86(x86 32-bit)
The launch priority is as follows:
- If the player’s operating system is x86 32-bit, HMCL will preferentially use
jre-x86to launch HMCL. - If the player’s operating system is x86 64-bit, HMCL will preferentially use
jre-x64to launch HMCL. - If the player’s operating system is ARM 64-bit, HMCL will preferentially use
jre-arm64to launch HMCL.
If you do not plan to support players on ARM 64-bit and x86 32-bit operating systems (letting HMCL use the system JRE environment), then your modpack only needs to include jre-x64.
If you want to use the same Java to launch HMCL in all cases, you only need to include jre-x86; regardless of the architecture of the player’s operating system, HMCL will try to use that Java.
If there is no matching version, HMCL will try to launch with the version that comes with the system.
Note:
Using 32-bit x86 Java may well cause game errors, insufficient memory, and other issues. We recommend providing x86 64-bit Java rather than x86 32-bit.
Shell (.sh) Version
When opened on a system that supports Bash, the SH version first checks for the jre-loongarch64, jre-arm32, jre-arm64, jre-x64, and jre-x86 folders in the same directory.
The check order, from top to bottom, is:
jre-x64(x86 64-bit)jre-x86(x86 32-bit)jre-arm64(ARM 64-bit)jre-arm32(ARM 32-bit)jre-loongarch64(Loongarch 64-bit)
The Java runtime in the corresponding folder is selected according to the architecture of the player’s operating system to launch HMCL.
If you want to use the same Java to launch HMCL on both x86 32-bit and x86 64-bit, you only need to include jre-x86; in that case, if the player’s operating system is x86 32-bit or x86 64-bit, HMCL will try to launch with that Java.
If there is no matching version, HMCL will try to launch with the version that comes with the system.
Note:
When updating and upgrading the launcher itself from within the launcher, only the main program is updated; the EXE shell or SH shell (i.e. HMCLauncher) is not updated. Therefore, it is recommended to re-download the EXE or SH version when building a modpack to ensure this feature works properly.
Method 2: Create a Shortcut
Method 2 can be used if you launch HMCL with the JAR version on Windows.
Directory Structure
First, let us assume the modpack root folder is tutorial (the folder can have any other name). The folder should contain the following files:
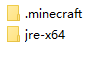
Here, .minecraft is the Minecraft folder and jre-x64 is your Java runtime. Let us look at the contents of these two folders separately:
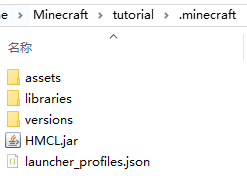
The image above shows the contents of the .minecraft folder, which contains the traditional folders such as assets, libraries, and versions, as well as HMCL.jar. This file is the jar file of the HMCL launcher; you can download the macOS or Linux version from https://hmcl.huangyuhui.net/download (both versions have the jar file extension and are in fact exactly the same thing, and can also be run by double-clicking on Windows, as there is no platform restriction).
We will use this launcher file next to start HMCL with the Java runtime bundled in the modpack.
Note: be sure to keep the file name HMCL.jar for the HMCL main program file; file names with a version number such as HMCL-3.2.117.jar will not work
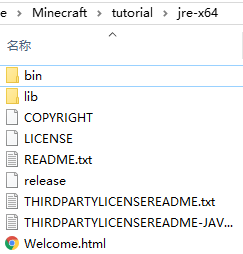
The image above shows the contents of the jre-x64 folder; at a glance it is a JRE folder.
Creating the Shortcut
Next, we create a shortcut so that HMCL starts with the Java runtime in the jre-x64 folder, and so that Minecraft also starts with that Java runtime.
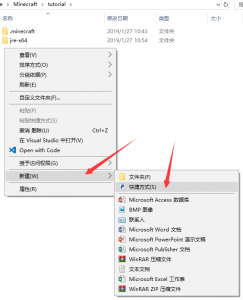
Right-click an empty area inside the tutorial folder to open the context menu, and create a shortcut.
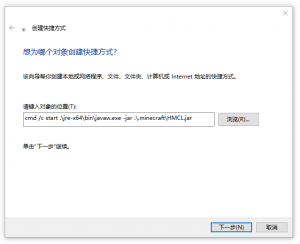
In the window that appears (as shown above), enter the following in the input box: cmd /c start .\jre-x64\bin\javaw.exe -jar .\.minecraft\HMCL.jar. Adjust jre-x64 and .minecraft\HMCL.jar according to your actual situation: jre-x64 is the path to your Java runtime, and .minecraft\HMCL.jar is the HMCL main program file.
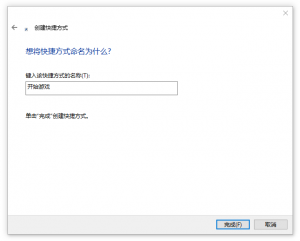
Then just give the shortcut a name (as shown above, Start Game is the name I chose).
After the shortcut is created, we still need to edit its properties. Right-click the newly created Start Game shortcut (if you chose another name, select that file and edit its properties), and choose Properties from the context menu; the shortcut’s properties window opens as shown below:
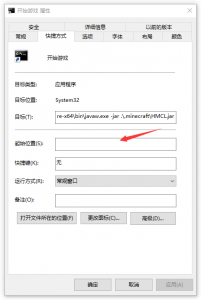
Delete all the text in the Start in field, leaving it empty. Save and close that window.
Done
The shortcut for starting the game is now ready to use. You can double-click this shortcut to open HMCL, and HMCL will also directly use the Java runtime you specified when launching the game.
Some Questions
1Q: What exactly should be placed in these Java folders? Can I just copy things in directly?
1A: Yes, just copy everything inside the JRE. You can refer to the image below:
——————————————————————————————————————————————————
2Q: Where can I find Java?
2A: There are many Java providers to choose from, such as Liberica JDK, Microsoft JDK, Oracle JDK, the Chinese Java mirror site, and Oracle openJDK, among others.
You only need to download the .zip archive file when downloading, and put all the contents of the archive into the corresponding folder.